

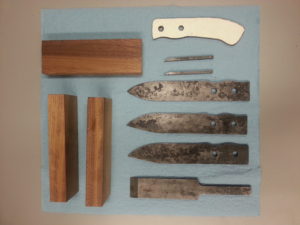
First Set of Ground Knives
Knives are primary and basic tools, they may even be the first true tool created by man from flinting rocks [link to come], and as such, throughout the ages various methods of making knives have been developed as new materials have appeared. From casting and cold forging bronze [link to come] to the revolution that ferrous metals brought in manufacturing [link to come] and now our modern industrial capacities, knives have remained an integral part of human survival and warfare. Through this article, I’ll cover my first experience at hand grinding knives, a method which has been used alongside medieval forging of the blades, but which has become more practical with the advent of belt grinders.
The blanks used for the blades was 1/8″ O1 tool steel 1″ by 6″, which can be heat treated following the initial shaping. The first step was to determine the blade length to tang ratio, I settled for a 3.5″ blade with a 2.5″ tang which would be pinned twice through the hilt. The idea was to emulate a full tang knife as much as possible to reduce stress concentrations and maintain the integrity of the blade. I was limited in the size to the stock because they were off cuts from work, and had to work with what I had. To turn this project into a complete full tang knife a 2″ by 10″ blank should be used.
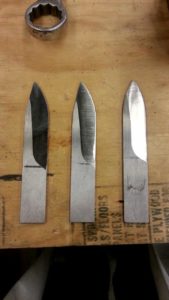
Two different blade profiles were selected for this project, a spear point (featured below) and 2 clip point knives. The outlines were sketched on card stock and when I was satisfied with the geometry, transferred to the steel with a Sharpie. The outline was then first cut out on the ban saw and then smoothed out on an 8″ belt grinder.
Cutting Out the Blanks
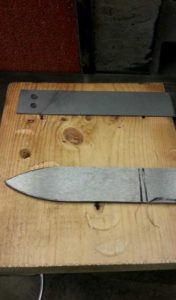
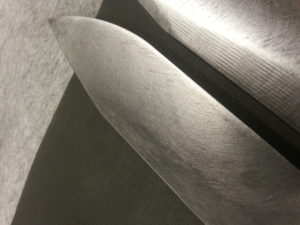
To create symmetrical and uniform bevels a simple jig was devised. Taking a cut off 2″ by 6″, a lip was made on the edge with the table saw 1/8″ deep so that a blade could lie flat against it. Then 5″ from that edge in the center of the piece, a hole was drilled and a bolt threaded into the underside, this would provide the adjustment for the angle of the bevel. Once the angle was selected, the bolt was secured with semi-permanent Locktite. The blade was secured to the jig by taping the handle portion with duck tape. The blade was then ground on the belt grinder until the edge was 40 thou thick, the limit to prevent damages when quenching. This is where I encountered my first problem of the build, the belt grinder was not a knife making grinder and had an obstruction on the right hand side, which made it impossible to obtain a perfectly symmetrical bevel on either sides.
Ground Bevels
The card stock templates where again used to transfer the outline to a melamine coated particle board to form the handle which was shaped to fit my hand (call me selfish). The board was cut out on the ban saw and the hand sanded to a comfortable shape. With a Sharpie the finger grooves were marked on the steel to be ground on wheel grinders this time.
Handle Pattern
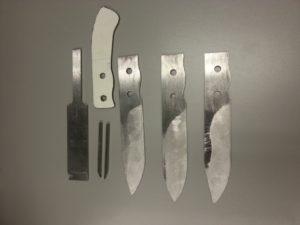
Prior to grinding though the 2 holes were drilled in the blanks using the mill to accept 1/4″ brass pins. With some extra steel I also decided to make chisels featured below, waste not they say.
Drilled Holes and Chisels
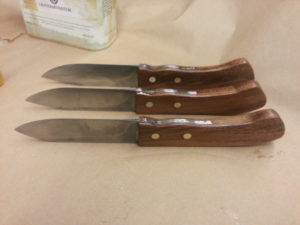
I selected some nice walnut for the handles and cut it to size, and attempted to feature a transition line from hard to soft wood to create a visual feature in the handle. The blades were heat treated at 850oC, 15 minutes to reach non-magnetic temperatures and then a 10 minute soak. The blades were then quenched in 30oC motor oil and then air cooled. All blades were then tempered for 2 hours at 160oC, though preferably it should have been 200oC for 1 hour. This was because I learned my second lesson, the oil residue should be washed off with soapy water prior to the temper to prevent the oil smoking out, this doesn’t happen at 160oC but starts at around 170oC with the oil used.
Heat Treated and Wood Selected
The blades were then cleaned with a hand file and the progressively polished using sand paper on a block of wood and the same motions one would use to sharpen a knife. One could keep polishing or used a buffing wheel to make short work of this operation, though I was happy with the rugged look this gave the blades.
Polishing
Using a ban saw the handles were shaped, the holes were drilled to match the handle’s individual blade and the heart was then cut out to accommodate it in the center using the ban saw with a fence. The whole assembly was then epoxied together and after the cure sanded to a smooth finish. Tung oil, a traditional method of finishing wood working projects was used to seal in the wood and bring out it’s natural grain colour.
Sanding and Tung Oil Application
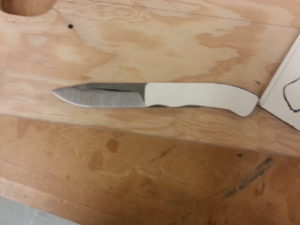
Here is the final product, an O1 tool steel clip point knife with a 22o bevel and a 15o grind with a brass pined walnut handle. Though the epoxy is a more modern glue, this method of making knives traces its origin all the way back to medieval times where it wasn’t uncommon for the bevel of smaller knives to be ground rather than forged. Since these knives are not made from stainless, appropriate care should be taken to properly clean the blades after use and oil them before storage.
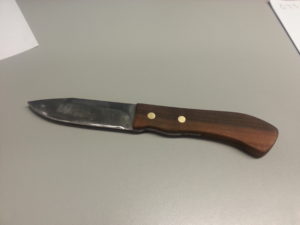
Clip Point Knife